You want to allow your website visitors to upload files in WordPress forms?
Giving the ability to users to upload files and media attachment to your WordPress website can make their life easy and it will be easier for you to collect the information of your users.
In this article, we will explain in detail how you can add file upload functionality to your WordPress form step by step.
Why to have a File Upload Form in WordPress?
If you want to collect the resume of the candidate or if you want to receive a profile image of the user then WordPress file upload feature is a great idea. With this feature you can allow your visitor to upload images, PDF files, Word documents and many other types of files.
Luckily, the Ninja Form has one of the easy to use WordPress file upload plugin extension that makes it easy for your site visitors to upload all kinds of file types to your contact forms.
File types allow to upload are:
- Documents (.doc, .xls, .ppt, and .pdf)
- Images (.png, .gif, and .jpg)
- Video (.mpg, .mov, and .wmv)
- Audio (.wav, .mp3, and .mp4)
So, let’s check out how to add the file upload field to your WordPress contact form with the help of Ninja Form.
Six easy steps to add a file upload feature to your WordPress form
Adding a file upload in WordPress for your site’s users will only take 5 minutes of your day! Follow these steps to set up your online file upload form.
Step 1: Create Your File Upload Form in WordPress
First step is to install the Ninja Form plugin from WordPress repository. Just install the plugin like any other plugin you install in WordPress.
- If you don’t already have Ninja Forms installed, in your WordPress Dashboard go to Plugins -> Add New.
- Search for Ninja Forms in the box provided, and click “Install Now.”
- After the installation finishes, click “Activate” and you’re ready to work with Ninja Forms!

You are now ready to create your first file upload form.
Step 2: Install & Activate File Uploads Add-ons for Ninja Forms
First, you will need to install and activate File Uploads add-on for Ninja Forms.
Ninja Forms add-ons are just like regular WordPress plugins and their installation is almost exactly the same process. To install any add-on, first download the add-on from your account page under the Downloads tab. Then, follow these steps:
- In your WordPress Dashboard go to Plugins -> Add New.
- Choose the “Upload” option at the top of the page.
- Click “Choose File” and navigate to the “zip” file you downloaded from your account on NinjaForms.com
- Click “Install Now”
- After the installation finishes, click “Activate” and you will be ready to work with the add-on you purchased. Repeat this step for each add-on you have purchased from Ninja Form.
After activation of plugin your WordPress website will get 2 new features:
- A File Upload field that can be added to any form
- File Uploads settings under Ninja Forms in your WordPress dashboard for configuring the add-on and choosing where your uploaded files will be stored
Make sure your license keys are entered in your WordPress Dashboard under Ninja Forms -> Settings -> Licenses, or you will not be able to receive automatic updates for your add-ons.
Step 3: Add a File Upload field to any WordPress form
You can create just about any form that you need for accepting files, or build upon an already made form. In this tutorial, we’ll start with a WordPress contact form where a user can input their name and email address.
You will now see a new field: File Upload. Make sure you add this to your form, as it is the field your users will be using to upload files.

You now have a file upload form in WordPress! All that’s left to do is configure the form and publish it!
Step 4. Configure your file upload form settings
Once your form is created, click on the gear next to the File Upload option to open the settings window. From here you can control the field label, file name, save location, and restrictions.
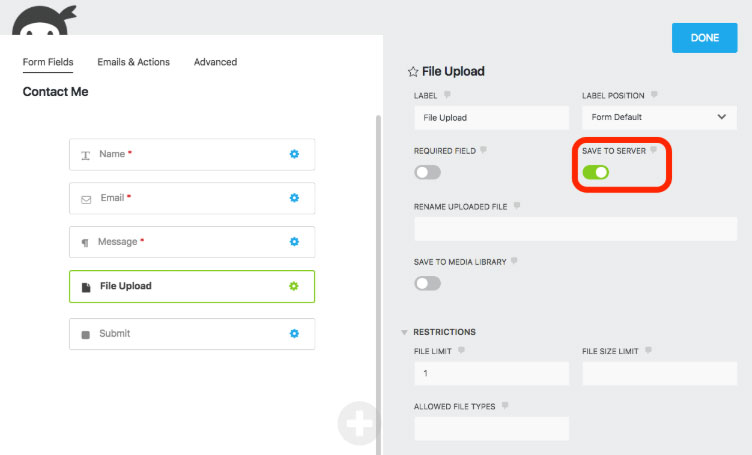
Under the restriction section make sure you also set a limit on how many files can be uploaded, the size limit of the file, and what file types you will allow. If you leave these sections blank then there will be no restrictions.
Take note of the Save to Server option marked in the image above. By default, File Uploads will save to your server. But if you would prefer Dropbox or Amazon S3, check the next section!
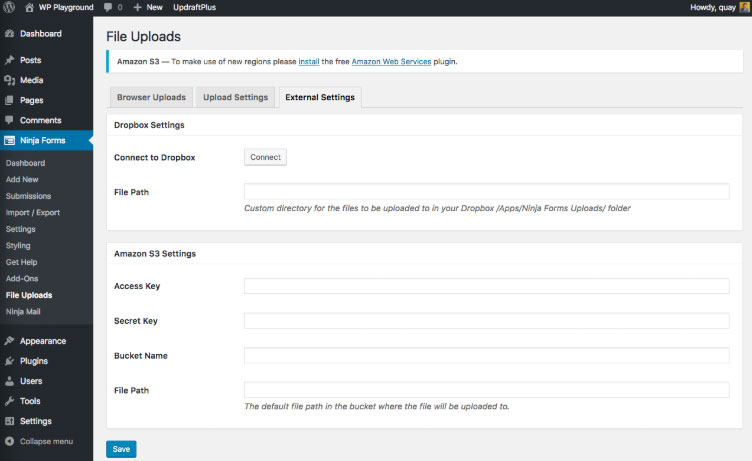
Step 5: Enable storage in Amazon S3 or Dropbox (if desired)
Depending on the available space on your server and the number/size of uploads you expect, you may not want to store everything on your server. If you want uploaded files to be saved to Amazon S3 or Dropbox, the configuration is a breeze.
In your WordPress dashboard under Ninja Forms -> File Uploads, click the External Settings tab. Here you can connect to Amazon S3 and Dropbox using the settings provided.
Now just head back to your file upload form and under Emails and Actions, add an External File Upload field. Click into its settings and turn it on, and you’re set!

Step 6: Set up additional email notifications for the file upload form
By default, your admin email action will include a link to the uploaded file. If you want to set up additional notifications to go to others, it’s easy to do.
Under the Emails and Actions tab, open the Admin Email action. In the Email Message body, you can select what fields from the form will be sent in the email. By default, {fields_table} is set. This will include all fields on the form that a user has filled out.

Download Ninja Form File Upload Field Now!
We hope this tutorial helped you learn how to create a file upload form in WordPress. You might also want to check out our guide on the How to Start a WordPress Blog and our guide on Best Email Marketing Services for Small Businesses.
If you liked this article, then please follow our Twitter account to get an update about our latest WordPress tutorials. You can also find us on Facebook.


0 comments:
Post a Comment