The following is external content provided as a free resource for blog readers.
You want to allow your website visitors to upload files in WordPress forms?
Giving the ability to users to upload files and media attachment to your WordPress website can make their life easy and it will be easier for you to collect the information of your users.
In this article, we will explain in detail how you can add file upload functionality to your WordPress form step by step.
Why to have a File Upload Form in WordPress?
If you want to collect the resume of the candidate or if you want to receive a profile image of the user then WordPress file upload feature is a great idea. With this feature you can allow your visitor to upload images, PDF files, Word documents and many other types of files.
Luckily, the Ninja Form has one of the easy to use WordPress file upload plugin extension that makes it easy for your site visitors to upload all kinds of file types to your contact forms.
File types allow to upload are:
Documents (.doc, .xls, .ppt, and .pdf)
Images (.png, .gif, and .jpg)
Video (.mpg, .mov, and .wmv)
Audio (.wav, .mp3, and .mp4)
So, let’s check out how to add the file upload field to your WordPress contact form with the help of Ninja Form.
Six easy steps to add a file upload feature to your WordPress form
Adding a file upload in WordPress for your site’s users will only take 5 minutes of your day! Follow these steps to set up your online file upload form.
Step 1: Create Your File Upload Form in WordPress
First step is to install the Ninja Form plugin from WordPress repository. Just install the plugin like any other plugin you install in WordPress.
If you don’t already have Ninja Forms installed, in your WordPress Dashboard go to Plugins -> Add New.
Search for Ninja Forms in the box provided, and click “Install Now.”
After the installation finishes, click “Activate” and you’re ready to work with Ninja Forms!
You are now ready to create your first file upload form.
Step 2: Install & Activate File Uploads Add-ons for Ninja Forms
In your WordPress Dashboard go to Plugins -> Add New.
Choose the “Upload” option at the top of the page.
Click “Choose File” and navigate to the “zip” file you downloaded from your account on NinjaForms.com
Click “Install Now”
After the installation finishes, click “Activate” and you will be ready to work with the add-on you purchased. Repeat this step for each add-on you have purchased from Ninja Form.
After activation of plugin your WordPress website will get 2 new features:
A File Upload field that can be added to any form
File Uploads settings under Ninja Forms in your WordPress dashboard for configuring the add-on and choosing where your uploaded files will be stored
Make sure your license keys are entered in your WordPress Dashboard under Ninja Forms -> Settings -> Licenses, or you will not be able to receive automatic updates for your add-ons.
Step 3: Add a File Upload field to any WordPress form
You can create just about any form that you need for accepting files, or build upon an already made form. In this tutorial, we’ll start with a WordPress contact form where a user can input their name and email address.
You will now see a new field: File Upload. Make sure you add this to your form, as it is the field your users will be using to upload files.
You now have a file upload form in WordPress! All that’s left to do is configure the form and publish it!
Step 4. Configure your file upload form settings
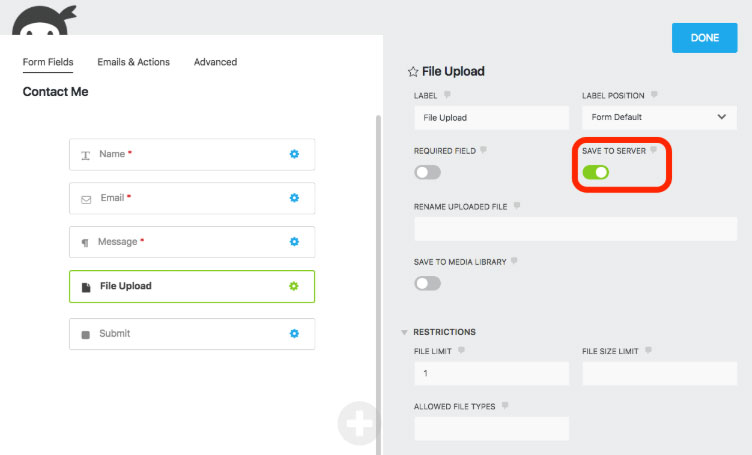
Once your form is created, click on the gear next to the File Upload option to open the settings window. From here you can control the field label, file name, save location, and restrictions.
Under the restriction section make sure you also set a limit on how many files can be uploaded, the size limit of the file, and what file types you will allow. If you leave these sections blank then there will be no restrictions.
Take note of the Save to Server option marked in the image above. By default, File Uploads will save to your server. But if you would prefer Dropbox or Amazon S3, check the next section!
Step 5: Enable storage in Amazon S3 or Dropbox (if desired)
Depending on the available space on your server and the number/size of uploads you expect, you may not want to store everything on your server. If you want uploaded files to be saved to Amazon S3 or Dropbox, the configuration is a breeze.
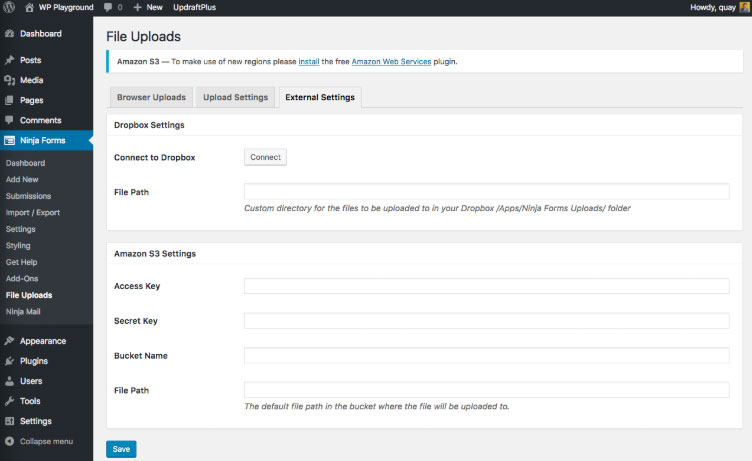
In your WordPress dashboard under Ninja Forms -> File Uploads, click the External Settings tab. Here you can connect to Amazon S3 and Dropbox using the settings provided.
Now just head back to your file upload form and under Emails and Actions, add an External File Upload field. Click into its settings and turn it on, and you’re set!
Step 6: Set up additional email notifications for the file upload form
By default, your admin email action will include a link to the uploaded file. If you want to set up additional notifications to go to others, it’s easy to do.
Under the Emails and Actions tab, open the Admin Email action. In the Email Message body, you can select what fields from the form will be sent in the email. By default, {fields_table} is set. This will include all fields on the form that a user has filled out.
If you liked this article, then please follow our Twitter account to get an update about our latest WordPress tutorials. You can also find us on Facebook.
The following is external content provided as a free resource for blog readers.
Are you looking to translate your website? Then you might want to consider Weglot, one of the easiest translation plugins for WordPress.
When we talk about business today, globalization is a word thrown around left, right, and center. In fact, we use the word so much that it’s as though it’s lost its meaning and impact – a classic example of semantic satiation.
However, globalization, which the Peterson Institute of International Economics defines as “the growing interdependence of the world’s economies, cultures, and populations, brought about by cross-border trade in goods and services” remains as important as ever when it comes to growing to your business on an international scale.
What’s more? Global success is very much dependent on your ability to successfully communicate with each of your individual global markets and audiences.
Of course, when we think of how to communicate successfully on a global scale, we think of translation. And given the rapid growth of the e-commerce industry, which is expected to be valued at 6.5 billion USD in 2023, the necessity to translate your websites and e-commerce platforms become all the more crucial.
Luckily, translating your website has never been easier thanks to the WordPress translation plugin Weglot.
In this Weglot review, we’ll take a look at its features, pros and cons, and help you decide if it’s worth the hype. Also, we’re going to take a look at all the features of Weglot, and how you can install it to have a fully functional multilingual website running in minutes.
About Weglot
Weglot is a platform-independent website translation solution.
Weglot was set up in 2016 in a small Parisian flat by founders Remy Berda and Augustin prot, Weglot is now a cohort of over 20 people who are trusted by over 50,000 websites globally to translate their content.
Weglot supports over 100 languages with its solution, and while this article will explore how to download and use the Weglot WordPress plugin, it’s worth noting that Weglot integrates with every CMS, making it a completely platform-independent solution.
To translate your WordPress site, you need to download the free plugin from WordPress.org. This free lightweight connector plugin integrates your site into the Weglot platform. Once it’s activated, you can instantly translate your site by simply specifying to which languages you want to translate your content.
Weglot Review: Why Use It on Your Site
Weglot comes with all features you’ll ever need from a WordPress translation plugin, such as automatic translation, manual professional translation, multilingual SEO optimization, and more. But what makes Weglot unique?
Let’s take a look at a few unique features of Weglot that makes it stand out from the competition.
Translating your WordPress site in 5 steps with Weglot
1. Find the Weglot plugin on WordPress
On your admin dashboard on WordPress, scroll along the sidebar and find “Plugins”, click “Add new”, a search bar will appear, type “Weglot” and search.
2. Install and activate the Weglot plugin
After you’ve searched, Weglot will appear as the first result. Click “Install Now”, this installation should take no more than a few seconds. When this is completed, you will be prompted to then activate the plugin. Simply click “Activate”.
3. Finalize your Weglot configuration
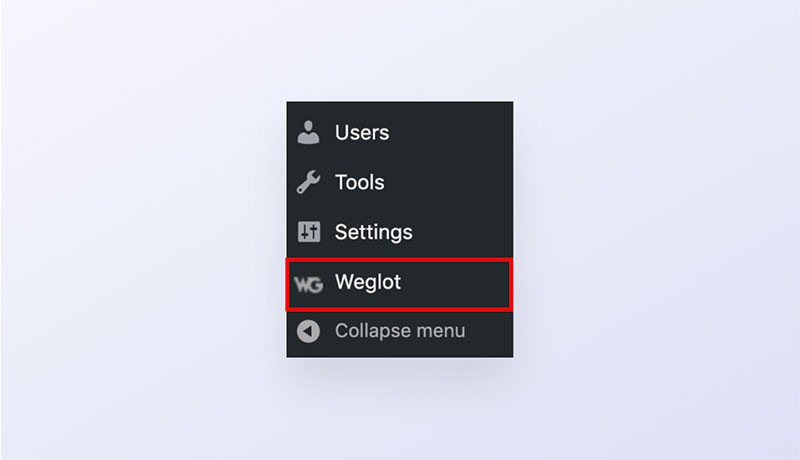
You will then see a new Weglot tab along the sidebar of your WordPress dashboard. You’ll need to click on this tab to finalize your configuration.
4. Enter your API Key & Choose the Original and Destination Language(s)
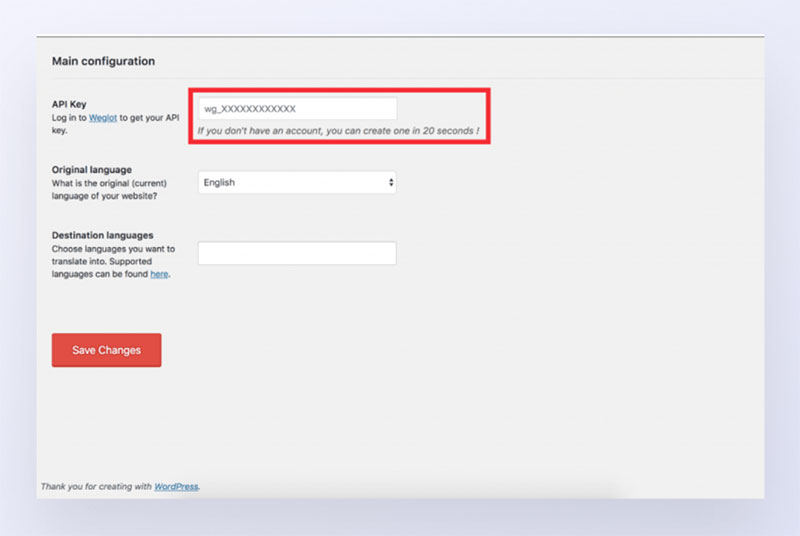
The configuration process comes to an end at this page. What you need to do is copy and paste your unique API key. This is available on your Weglot account dashboard (you’ll have to login or create an account to get access to this).
Once the API key is pasted in, all you need to do is select the original site of your website, and then the destination language(s). (i.e. the language(s) you want to translate your site into). When this is done, click “Save Changes”.
5. Your multilingual site is live
Once these changes have been saved, go onto your website and notice the language switcher. Your site is now completely multilingual. At this point, you also have the option of customizing your language switcher to change its position on your site or by changing how it looks. You can also make use of other advanced features such as ” Translation Exclusion” which allows you to choose pages or specific parts of your site that shouldn’t be translated.
Works With Any Platform
Even if you have websites on multiple platforms, like WordPress and Shopify, you can easily manage their translation from a single account.
With their Pro plan, you can translate up to 3 sites. With Enterprise and Corporate plans, you can translate up to 15 and an unlimited number of sites respectively.
Visual Editor for Manual Translation
Automated translation is the perfect choice for you if you want to translate your content quickly and easily without having to hire a professional translator. Not only can you make instant translation with Weglot, but the plugin also makes it super easy to edit your translation with the visual editor.
With its visual editor, you can make changes to your automated translated content right from the frontend of your website. All you have to do is to go to the Visual Editor tab and click Start Editing.
You’ll be directed to your website. Just click on the Edit icon of the element where you want to fix the automatically translated content and start customizing it from the frontend.
What makes the Weglot plugin so good?
When it comes to translating your WordPress site, a number of options are available. However, Weglot offers the most comprehensive, user-friendly, and intuitive solution on the market. Some key features include:
Installation and set up: Unlike other options, Weglot is a no-code solution and so is extremely user friendly. It auto-detects all of your content (no matter where it’s coming from e.g. another plugin) and you can have your multilingual site up and running in 5 minutes.
Compatibility: Weglot integrates seamlessly with any CMS meaning you don’t have to worry if WordPress isn’t your CMS of choice. Check out a list of integration guides here.
Simple Translation Management: Weglot uses automatic translation to translate your site the first time around. However, you can then manually edit translations or, if required, Weglot can provide access to professional translators if verification is required. Furthermore, the translation management features include a ‘’visual editor’’ which allows you to edit translations in a live preview of your website.
SEO Optimised: Weglot is an SEO optimized solution meaning that all your content is indexed following Google’s best practices. It translates all of your metadata and automatically adds hreflang tags, meaning that your international SEO is covered.
Unparalleled Customer Support: Weglot has a rigorous support team who will respond to any query within one business day and work quickly to find solutions to any issues you may experience.
Cons of Using Weglot
Now that we’ve looked at the benefits of using Weglot, it’s worth taking a moment to examine some of the cons of using Weglot.
1. Pricing
Weglot is a premium translation platform. While it has a free plan, it’s limited to translating up to 2000 words and 5000 translated page views per month.
2. Ownership of the content
The ownership of the translated content is unclear. As it seems, as you cancel the subscription, you won’t be able to display the translated content on your site.
Weglot’s Support and Pricing
Weglot provides you with superior support customer support via email. Their extensive knowledge base guides you through every aspect of translating your website with Weglot.
Weglot has a limited free plan for those who wanted to test the service before opting for a premium plan. They also offer 5 premium plans:
Starter: € 9.90 / month for 1 translated language and up to 10,000 words
Business: € 19 / month for 5 translated languages and up to 50,000 words
Pro: € 49 / month for unlimited translated languages and up to 200,000 words
Enterprise: € 199 / month for unlimited translated language and up to 1,000,000 words
Corporate: € 499 / month for unlimited translated language and up to 5,000,000 words
Conclusion
If you’re looking to grow your business on an international scale, Weglot is the most comprehensive translation solution available to help you make your WordPress site multilingual.
Its intuitive dashboard, quality of translation, and access to over 100+ languages make it the best option on the market. A free version of Weglot is available for up to 2000 words and 1 translated language, pricing for paid plans start at €9.90 per month.
Why not try out Weglot’s 10-day free trial to see for yourself how going multilingual can transform your WordPress site.
Over the last few years, Envato has expanded its operations and launched a freelancing marketplace, website builder, online tutorials and courses service, and more.
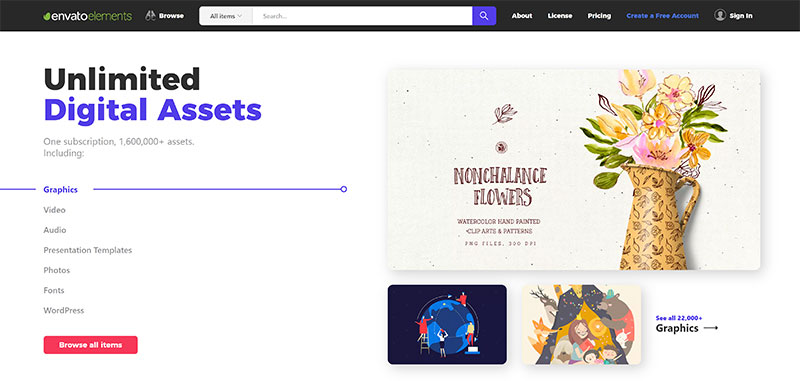
The service that has made the biggest impression is Envato Elements; Envato has been marketing Envato Elements as the “Unlimited Digital Assets”.
If you purchase an Envato Elements membership, you will gain access to over 1,900,000+ digital assets. These assets can be downloaded and used an unlimited number of times.
This Unlimited Digital Assets includes a large and growing collection of videos, audio files, photos, graphics, illustrations, fonts, HTML templates, presentation templates, and WordPress themes and plugins, as well as many other digital assets.
In this article, I would like to take a closer look at the Envato Elements service and show you why many content creators and developers are signing up.
What is Envato Elements?
Envato’s main digital asset resource directories continue to sell products on an individual basis. These prices are set by the asset author, however Envato takes a fee for allowing the author to sell on their platform.
The cost of purchasing items on Envato websites will, therefore, vary greatly. For example, you might pay $60 for a WordPress theme on ThemeForest, $25 for a WordPress plugin on CodeCanyon, $35 for a logo on GraphicRiver and $5 for a photograph on PhotoDune.
As you can see, if you are regularly purchasing digital assets for your projects, your expenses can quickly rack up.
Instead of paying for each item individually, Envato Elements gives you access to a huge digital asset archive for just $16.50 per month.
The archive contains WordPress themes, plugins, graphics, fonts, music, stock photos, and much more. There is no restriction on how many times Envato Elements members can download these items.
When you consider the savings that Envato Elements could give you, it is easy to understand why the service is growing in popularity.
What Does Envato Elements Offer?
Visitors can browse around the Envato Elements website freely and look at what is on offer, however I recommending signing in as Envato publish a host of free digital files on the home page and they regularly change which files are available.
You can sign in using your Envato account. If you have ever bought anything from an Envato marketplace such as ThemeForest, you should have an account.
If not, it only takes a few seconds to sign up for a new account.
When you log in and start browsing Envato Elements, you will be surprised looking at how big their archive is.
At the time of writing, over 1.6 million assets are available for download; however, the archive is growing quickly, with more than 22,000 new items added within the last week alone.
In addition to free files, the home page also shows the latest items added to the archive and a curated list of what they consider to be top-quality assets.
Email templates, image backgrounds, and infographics are available too and members also get access to tutorials and courses on TutsPlus.
Looking for Lightroom Presets? – Check out our “30+ Best Photoshop Actions of 2019” to help you take your photographs to the next level.
If you have a WordPress website, I recommend installing the Envato Elements WordPress plugin. This allows you to browse through the archive from within the WordPress admin area and insert media directly into your posts and pages.
80 template kits and over 1,400 page templates can also be viewed within the Envato Elements WordPress plugin. You can insert these into your website using Elementor or Beaver Builder. Both of these drag and drop page builders are free to download.
There is something for everyone in the Envato Elements membership.
If you’re a blogger, you will gain access to a huge library of stock images that you can insert into your content
YouTubers will love video templates, audio files, and available motion graphics
Website designs can utilize thousands of fonts, vectors, icons, logos and more
Of course, 1.9 million items means nothing if the quality of those items is poor.
Thankfully, that is not the case. Envato has obviously taken a strict approach as to which items are included in their Elements archive and which are not. I did not come across any items that were included to just boost their catalog numbers for marketing purposes.
It is also important to note that many popular items available in Envato marketplaces are not free to download under an Elements subscription. In other words, a subscription to Envato Elements does not permit you to download any file from any Envato marketplace.
Let’s take a closer look at how you can find great items on Envato Elements.
Finding the Items You Need in Envato Elements
With such a large library of digital assets, you are going to have to narrow down your search if you want to find what you are looking for.
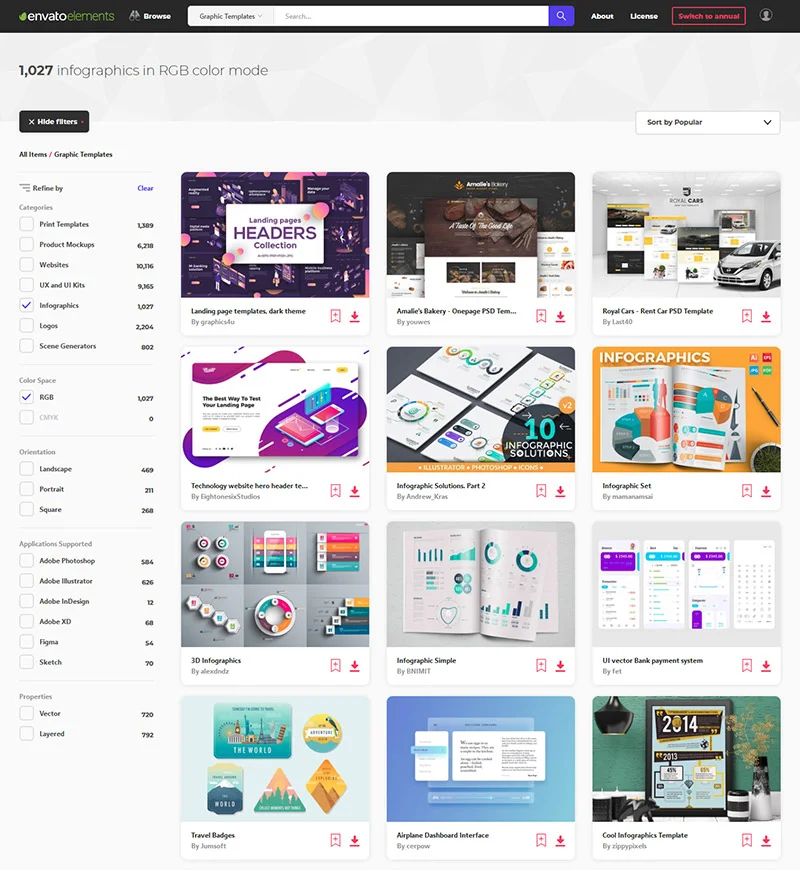
Thankfully, this is simple, since Envato allows you to search through categories and apply filters to ensure that search results are more relevant.
If you know exactly what you want, you may prefer to use the search bar that is displayed at the top of every page. You can restrict the search to one particular category to help show better results.
Clicking on the “Browse” button at the top of the page will take you to the “All Items” page.
A list of item categories is displayed at the top of this page. Underneath is a selection of items from each category. This is a great way to shop around the different items as you can see a preview from each category.
If you hover over the “Browse” button, a list of item categories and sub-categories will be shown.
This is a useful menu as you can access it from any page on Envato Elements.
One of the most effective ways of finding suitable digital items is to use filters.
When a category is selected, a list of filters will be displayed to the left-hand side of the page. This allows you to refine your search further by restricting displayed items to specific sub-categories and other relevant tags.
For example, you can restrict results to items that work with Adobe Photoshop.
Good search functionality is essential to any large digital library that contains millions of items.
If you use the right combination of keywords, the search bar at the top of each page might be all you use to find items; however, I found myself going into categories frequently and narrowing down my search using filters.
Be sure to check underneath the main description area for items too as related items are displayed underneath.
The Envato Elements Membership
You do not have to be signed in to browse Envato Elements. Visitors can freely browse the whole digital archive and view the same items as members. The only difference is that on item pages, there is an option to download instead of a banner encouraging you to sign up.
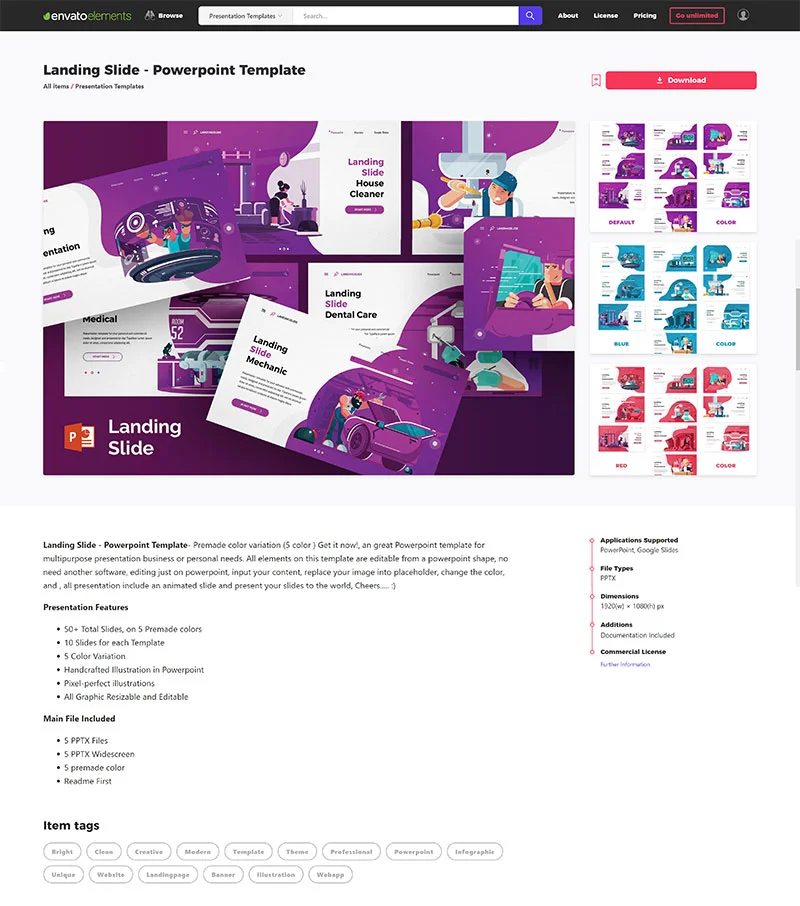
The item page gives you a full explanation as to what the item is and what it can do. It also shows the files that are included, the file types, the applications that can be used with the item, item dimensions, included color variations and other relevant information.
When you’re just browsing around and doing research for a project, it pays to take a note of the items you like.
You can do this by bookmarking items and placing them into collections. You can then review these items later when you’re ready to get started on your project.
Any file you want has to be added to a project if you want to download it with a license. All you have to do is add the title of a new project or assign the file to an existing project. You can then download the file.
You can still download files without a license if you wish.
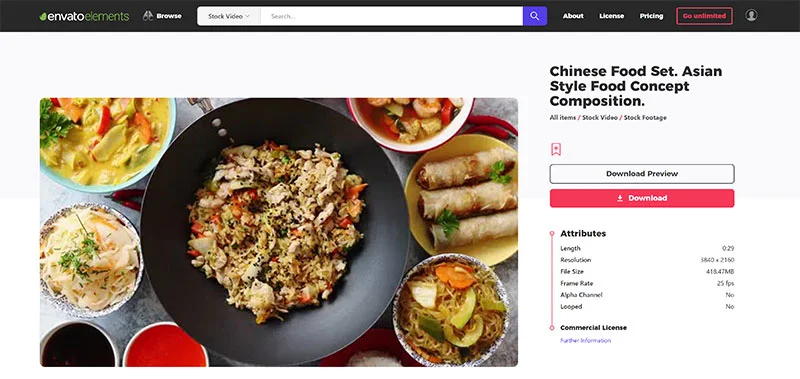
A preview is available for video files. This lets you see a video before deciding on whether you should download it.
Envato details information such as resolution, file size, frame rate, and looping, for each video.
What I like about the whole system is its simplicity. You do not have to jump through pages and pages to download the item you want. You just click on the item you want, assign it to a project, and click download.
All stock image and video files are high quality too. Most of the photographs I checked had a resolution of over 5,000 pixels in width. Likewise, most video files are available in 1080p or 4K resolutions.
How Much Does Envato Elements Cost?
An Envato Elements membership gives you access to over 1,900,000+ digital assets on Envato Elements and over 50,000,000 stock photos on Twenty20. Courses and eBooks from TutsPlus are also provided with the membership.
All of this can be yours for just $16.50 per month plus tax.
Students can save a further 30% by entering a student email address when signing up.
You will be pleased to hear that you are not forced to sign up to a long-term contract. The membership is charged monthly and you can cancel at any time you want.
Whilst you can download an unlimited number of digital products, a little common sense has to be used as this does not mean you fully own the asset. For example, you are not allowed to download an item and resell it or use print graphics on t-shirts for selling commercially.
I believe that this is a service that many people will benefit from using. When you consider how many items are available to you, the monthly cost of using the service is incredibly low. Memberships can be canceled at any time too so you do not have to worry about being tied into a long-term contract.
What is particularly pleasing is the quality of items that are included. If you delve deep in a lot of stock image websites, you will come across many low-quality images, videos and graphics. Envato could have included more items to boost their number of items, but instead, they have put quality controls in place to ensure each item is actually worth downloading and using.
Whilst I do appreciate what Envato Elements has to offer, the service obviously is not for everyone.
Firstly, like any online membership service, you need to use it regularly to make a subscription worthwhile. If you do not need to download images, videos, audios, and other digital files on a regular basis, then you would be better just purchasing the items individually as and when you need them.
Secondly, Envato Elements may not contain the items you are looking for. Many popular files on Envato marketplaces are not included in an Elements membership. This means that you either need to restrict yourself to the files that are available or you need to purchase the items you need separately.
My second point is important to understand before you sign up, however, you also need to remember that a monthly membership for Envato Elements is only $16.50 per month. You aren’t paying hundreds of dollars every month.
I believe that for some customers, Envato Elements will be an “All-in-One” solution that gives them everything they need; but for others, the Elements service will be a low-cost addition that complements other purchases.
I encourage you to visit Envato Elements and browse around to see what it offers. It will help you appreciate the quality of items that they have in their archive.
The following is external content provided as a free resource for blog readers.
WordPress themes allow us to completely change the look and feel of our website in no time, and Astra takes that to a whole new level. Astra is currently one of the most popular, fastest-growing and highest-rated theme in the WordPress repository today with its free version gathering over 600,000 active installations. That’s huge! So if you are interested in learning more about the Astra Pro theme and all its functionalities, here is a comprehensive Astra theme review to help you out.
In this article, we are going to explore Astra and find out the reason(s) behind the popular demand. We will then look at its premium version and make a decision whether we believe it is worth the money or not, based on the findings of our review.
Astra theme is known for its excellent PageSpeed and feature-rich customization. Free Starter Sites bundled with Astra helps you to create a professional website in minutes. Top of that Astra Pro version offers additional value-added features at a lesser price than the competition makes Astra a complete WordPress theme.
We’ve used this super-popular, highly-rated theme multiple times, for several websites, and have managed to deliver awesome web designs and can tell you ALL about it – in a true, honest and unbiased review.
Before we go deep into our review of Astra theme, lets first understand, what is Astra.
Astra is a free WordPress theme developed by the talented team of Brainstorm Force, Astra is one of the best multipurpose WordPress themes on the market.
Brainstorm Force is an Indian-based web development company. They are a group of professional WordPress developers that have developed, aside from Astra, various other plugins.
They are also the team behind the popular Ultimate Addons for Gutenberg, which transforms the Gutenberg editor into a what we can call a mini “native WordPress page builder”. It adds advanced custom blocks with extended features and capabilities.
It strikes a rare balance between style and performance with flexible customization options and powerful integration with popular services and platforms.
The theme gives you access to a rich theme options panel paired with tons of pre-made layouts and compatibility with almost every popular page builder plugin.
Astra – Fast, Lightweight & Customizable WordPress Theme for Any Website
But despite being packed with powerful features and functionalities, the Astra theme is super lightweight, and also well optimized for speed and performance.
Now, with all this on the table, it is worth noting that the theme is available in a free version and a paid one – Astra Pro, with the latter packing in more advanced features.
However, do you really need the Astra Pro version – especially with hundreds of thousands of users satisfyingly using the free one?
Well, all these types of questions will be answered in our full in-depth Astra Theme Review.
By the end, you will have a detailed insight into what both versions of the theme have to offer, and which one is right for you.
Before you continue, have a quick look at this short video with an Astra Quick Start Guide.
So without further delay, let’s get started:
Why You Should Use Astra? The Pros!
Before we dig deep into our detailed review of Astra theme, let’s first understand, why one should give Astra theme a shot.
Astra WordPress theme is available for free, rich in customization, and optimized for performance. What more reasons could you want from a WordPress theme?
However, we will not leave you with some general ideas.
Here are all the big reasons that make Astra a must-have theme for your WordPress website:
# Beginner-Friendly Design Options
It’s easy to spot a good design when you see one! But creating one from scratch is a whole different story. Even if you have advanced page builders at your disposal that require no coding – you at least need to have proper knowledge about UI/UX to conjure up a decent looking website.
Now, even if you are a complete beginner with no designing knowledge, you will still be able to create professional-grade websites using Astra.
# Powerful Starter Sites
To get you started, Astra comes with a companion plugin called Astra Starter Sites.
Once the theme is installed and activated, you will have access to over a 100+ pre-built website templates, most of which are free. This website templates are professionally designed pre-made website demos (made with Elementor, Beaver Builder, Brizy and Gutenberg each) that you can install on your website with a simple click.
What makes them so good is that they are not just single page templates, they are entirely functional sites with all the essential pages, plugins and features bundled into one package.
It covers multiple niches and various design styles, so you are bound to find something that you like.
On top of that, the theme is compatible with almost every popular page builder plugin. Therefore, if you dislike certain details about the starter site you import, you can easily make tweaks in the layouts to fit your taste.
In addition to the starter sites, the extensive customization features and options Astra offers in both the free and premium versions have garnered a lot of praise that also attracted a lot of users.
In the Pro version, the extended customizer options cover almost every element on your website. You can alter the background color, set custom typography, change the site’s layout, etc. of almost every part of your site.
Since version 2.0, BrainStorm Force’s team has completely reworked the customizer to make it easier to design and customize your website. Its performance and usability drastically improved and we’ll cover them in-depth in this review and we’ll also be including a comparison of the old and the new customizer.
Even in the free version, you still have a wide variety of customization options, which makes Astra one, if not the most generous free themes out there.
# Responsive Design
The majority of online traffic is moving to mobile which makes it super important for your website to be mobile-ready. Luckily, the Astra theme follows a responsive design language which makes your website mobile-friendly from day one.
So no matter, if a user is viewing your site from a desktop or small-screen mobile phone, you can rest assured that they will get satisfying user experience.
Even during our Astra theme review, we have tested it on some sample site, the responsive design works flawlessly with all the modern WordPress Page Builder plugins.
# E-Commerce Support
Granted there are many eCommerce compatible free WordPress themes on the market, but they rarely deliver good designs and professional aesthetics. But, with Astra, it is completely different.
As you have seen, the Astra theme comes with tons of customization options and ready-to-use premade layouts, including eStore demos. On top of that, with WooCommerce integration, you will be able to set up a full-fledged online store and start your eCommerce business right out of the box.
# Super-Fast
Astra has been built from the ground up with a focus on speed and performance. WordPress websites that use Astra in comparison to other themes, load faster and have snappier performance.
We have provided a more detailed look at how Astra manages to deliver these blazing fast speeds in the following section.
Now that we have a general overview of what Astra is, in the following sections, we are going to delve deeper into the features and capabilities of it.
By the end of the article, you will be able to make a confident decision about whether you should purchase Astra Pro or not.
Astra: Performance
One of the key USP (Unique Selling Point) for Astra is its super-fast performance. But on the contrary, multipurpose WordPress themes are notorious for their bulky size which slows down PageSpeed.
Well, Astra does use three awesome measures to ensure optimized performance and quick load time.
According to the developers of the product, the size of the Astra is less than 50KB which makes it super fast. They claim that it loads in just 0.5 seconds with default WordPress data.
On top of that, Astra complies with all the best coding standards using much of the WordPress data which also benefits in optimizing performance.
And lastly, the developers made sure to stick to Vanilla JavaScript only. This prevents jQuery from interfering and affecting the loading speed.
With all these measures working together, Astra advertises a load time of less than half a second. Although your mileage will vary depending on what type of content you have on your website. But it is likely to be better and faster compared to other market alternatives.
We’re going to put that claim to the test right here.
We’ll be using a shared hosting test server located in Germany and testing Astra several times. We’ll be using Pingdom Tools for the test with the test server set at North America, Washington DC, meaning a transatlantic trip for our website.
# Default Astra Theme Test
For this first test, we installed Astra, created a bunch of empty pages and added dummy text content. Astra Starter Site plugin is also installed and activated, but we didn’t import a template.
Here’s the result for v2.2.1:
We weren’t able to meet the 0.5s (500ms) load time with the default installation, but that’s understandable since we’re using a cheap shared hosting service to test this. In the end, this is a spectacular performance and loading time.
While one would expect that the increased page size will make no difference at all since it’s very small or perhaps even have a very small negative impact (perhaps an additional 1-5ms load time), the opposite is true. It loaded faster and not just by a small margin. We’e talking about hundreds of milliseconds here.
# Default Astra with Astra Pro But No Modules Active
For the next test, we’ll be testing the same site but this time, with Astra Pro installed, however, we will not activate any modules.
The results for v2.2.1:
The number of requests, page size, and load time increased. It seems that just installing Astra Pro, even without activating any modules at all, added some sort of code in the theme, which is understandable, but we can see that it is still as lightweight as ever.
# Default Astra with Astra Pro and the Majority of Modules Active
We’ll be testing the same site for the third time but this time, all modules are active, except for the following:
The reason is that we’ll need to install prerequisite plugins for these to be activated. Our goal here is to test the performance of Astra and its direct Add-Ons only.
Here’s the result for v2.2.1:
Version 2.2.1, the page size almost doubled but the load time and the number of requests have only slightly changed, but even with a larger page size, it still has superior performance.
# Astra Starter Site with the Majority of Modules Active
For the final test, we’ll be able to have insight as to how Astra would perform in a real-world scenario.
We’re going to import one of the sites from the Starter Site library and check its performance.
Overall, this test site will consist of the following:
Astra Pro with almost all modules activated
Astra Starter Site plugin
Astra theme
Elementor
Ultimate Addons for Gutenberg
WPForms Lite
Starter Template called “BBQ Restaurant”
And the result of v2.2.1:
We can see that, the result is still pretty impressive!
Remember that we are testing using a shared hosting server in Germany and our Pingdom test server is in Washington DC. The site still managed to load in under 1 seconds! The page size and the number of requests are probably even lower than your average website.
Astra’s performance is top-notch. Even on a dirt-cheap hosting service, it was able to perform excellently. So far, we can say that Astra Pro is worth it!
In the next section, we are going to take a quick tour of Astra Pro’s features.
By now you should have a clear idea of everything you can do with the Astra theme. However, if you want a bit more technical insight into all its bells & whistles, then here is an in-depth look at all its key features:
# Astra Starter Sites
Astra comes with over 100+ professionally designed ready-to-use demo websites. Some of them are available with the free version of the theme while many can be accessed when you purchase their Mini Agency or Agency Bundle.
Astra demo layouts are developed around various different niches and can help you start anything from basic blogs to online businesses and eCommerce websites.
During the Astra review, we have checked and installed a couple of agency and eCommerce starter sites and all the development and import of starter site demo was easy and seamless.
You are likely to find a demo layout that fits your design requirements. And in case you want to make some edits to the overall look and feel, that too can be managed with the tons of customization options bundled in with the theme.
It would be an injustice to simply state that the theme is rich with customization options.
In our Astra theme review, we dug deep to understand and unveil the functionalities of the customization options offered in the free and paid version of the Astra theme.
Based on our findings, we can positively say that if you are getting the free version of the theme, you will get access to all the basic and necessary customization options that are more than enough to start your website.
However, Astra Pro comes in bundled with tons of advanced customization and design options to help you get complete control over how the site looks and feels.
Here is a look at the overall customization potential of the Astra theme and everything you can do with it:
Tons of Site Layout variations – boxed, full-width, and padded with full control over spacing, margin, and other parameters.
Several inbuilt header and footer options giving you complete control over how they look and feel.
Support for sticky and transparent headers.
Offers Mega Menu support.
Tons of color & typography options.
Dedicated sidebar with loads of settings and customization options.
# Blog Layouts
Astra Pro brings tons of blog layout variations to help you present your content in a unique way:
Grid Layout.
List Layout.
Masonry Layout.
First Post Highlighting.
Excerpt Count.
Date Boxes.
Blog Structure Control.
Post Pagination.
Infinite Loading.
# Custom Layouts
All the custom layout options are preserved for the Astra Pro users. However, here you will be given complete control and advanced tools to create your own custom layouts.
You will be able to create custom headers & footers, set up custom display conditions, build unique 404 pages, and even use hooks to inject custom code and content anywhere on your website.
# Integration with Learning Management System
Astra Pro offers seamless integration with LifterLMS and LearnDash, two awesome learning management systems. These platforms allow you to create, manage, and distribute online courses for your readers.
Astra contributes well with advanced settings that let you enhance user experience with additional styling on such websites.
# SEO Optimization
Astra brings inbuilt Schema Integration and comes with basic schema markups which helps to deliver rich SERP snippets to help bring more traffic to your website.
Not only that, but the theme is developed following the best coding standards to make sure to offer better SEO performance.
# Astra Widgets
Theme Astra comes with tons of free widgets to help you display additional information on your website.
Address Widget: Helps you add a widget to your business address on your website.
Info List Widget: Helps you add an info list anywhere on your page. You can even use icons to create an awesome looking list if you want to.
Social Icons Widget: A dedicated widget to show all the popular social network icons on your website. All you need to do is select the social networks (it supports all popular social networks) and the widget will show them on your website.
# WooCommerce Support
Both Astra and Astra Pro come with WooCommerce support but the pro version brings in much more advanced options like:
Next, let’s check out their support and documentation.
Support and Documentation
Aside from features and pricing, another important thing for premium products is support and documentation. In spite of how great a product is, people will still have questions.
So a critical question is: if you experience a problem and you need help, how fast can the team give you a satisfactory reply? Can they even help you?
Is the documentation any good? Can you easily find what you are looking for? Can you clearly understand what’s documented?
Those questions will help us understand whether a company or team is dedicated to serving its customers.
Therefore, in this section, we are going to find out the kind of support Brainstorm Force has and check out if their documentation is good or not.
Let’s begin!
# Documentation
Their documentation is one of the most extensive we’ve ever seen. They both have videos and articles that thoroughly explain every item in detail.
Their documentation contains over 200 articles discussing and detailing each feature the theme has to offer.
It’s very easy to navigate around their docs. There is a search form, a sidebar and a nice categorized grid of menus as its index page.
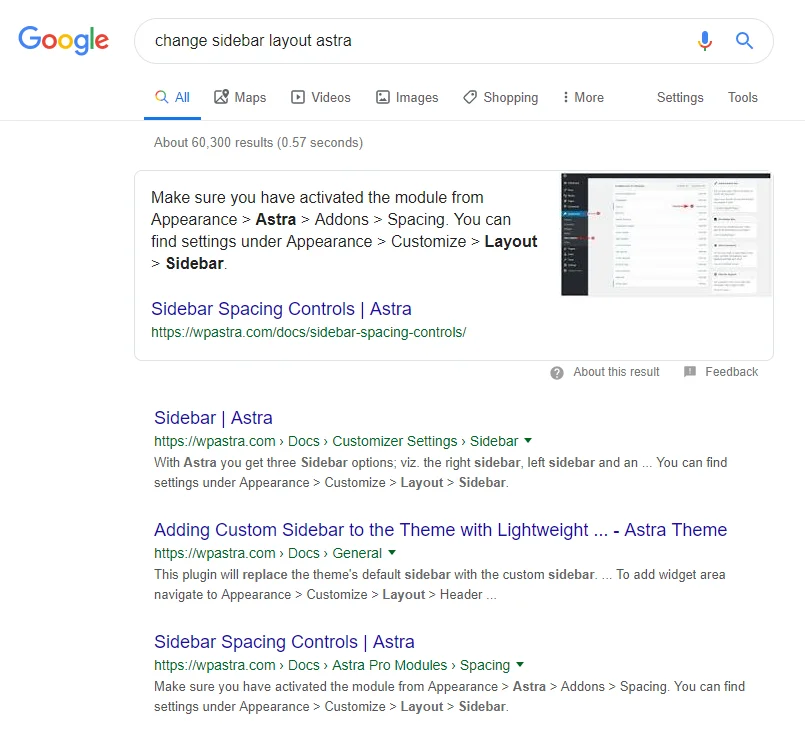
If you want a really quick way of accessing the documentation, you can just type in whatever you want to lookup for followed by the keyword “Astra” in Google and, most of the time, the top results will link to the official documentation.
You have two ways of accessing Astra’s documentation.
You can either bookmark their documentation page so you can easily access it or you can just open up a new tab and then type whatever you are looking for, followed by the “Astra” keyword and let Google guide you to the relevant documentation page.
The actual documentation is easy to understand. It’s clear, concise and well-structured.
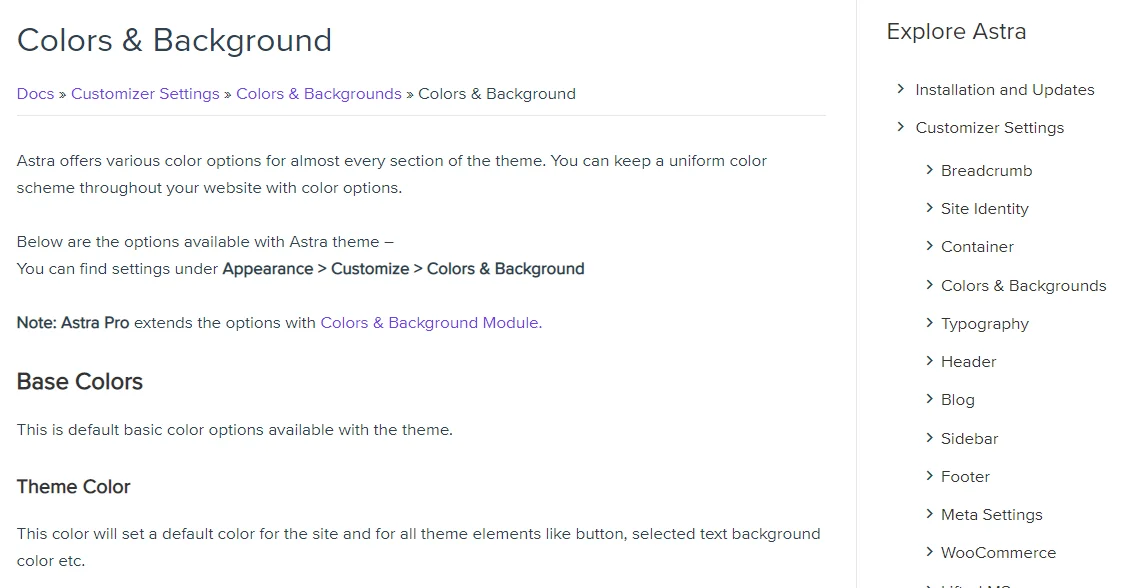
Above is a screenshot of their documentation page for the Colors & Background module.
See how there’s a breadcrumb underneath the title which lets you know where you currently are and trace back to previous sections? There’s also a sidebar on the right containing links to other articles in the documentation.
Video Documentation and Tutorials
Aside from their text-based documentation, they also provide video documentation and tutorials on their own YouTube channel. For those who are more into video demonstrations and tutorials, you’ll find this very useful.
Their YouTube channel also contains information about general WordPress usage. They have videos not only for Astra but also for their other products like the Ultimate Addons, Convert Pro, etc.
# Support
They offer three types of support: pre-sale, pro and free. If you access their support page, you’ll be greeted by this:
Their support page will first attempt to direct you to their documentation by asking you what kind of problem or question you have. If there are no results based on your question, you can then access their actual support page (the button to submit a ticket will still appear even if there are results based on your question).
One downside here is that there’s no way to go directly to the actual support page without having to type something in the box. It’s an extra step.
While their support can be considered as one of the best in the market, there’s still a handful of people saying they are slow to respond, which is evident in their Facebook Page.
For the majority of the complaints like this, however, we can see a common pattern. The tickets of complainants were almost always sent during holidays or weekends. We can, therefore, say that you can expect a slower response time during these days. This is why our rating for their support is the lowest in our table at the beginning of the article.
If we had to nitpick and find something where there is room for improvement, this would be it. As a company serving hundreds of thousands of customers, they should be ready to answer questions as fast as possible, no matter the day.
Next up, Astra: Free Vs. Pro!
Astra: Free Vs. Pro
As mentioned earlier, Astra delivers all the basic and necessary functionalities with the advanced options saved for Astra Pro.
We have reviewed the free Astra theme as well as the paid version called Astra Pro separately. And as per our Astra theme evaluation, the Astra Pro can be considered as a Value Addition Pack to the already awesome free Astra theme.
In terms of user experience, you might consider Astra as the base theme with Astra Pro functioning more as a dedicated page builder for that theme.
Astra Pro – Exclusive Features
By now, you should have a basic idea of what features you will get if you upgrade to the Pro version. However, here is a more concise look at all the extra features bundled in with Astra Pro.
Design: brings support for sticky header, mobile header, page headers, mega menus, and extended color & typography controls.
Layout: support for different layout variations like boxed, full-width, padded, fluid layout, and spacing controls.
Support for Custom Layouts: create headers, footers, 404 pages, and custom hooks.
Typography & Color: extra control over your site fonts, font style, font size, colors, and so on.
Blog Layouts: It introduces tons of blog layouts like the grid, list, masonry, date box, excerpt count, blog structure control, post pagination, infinite loading, and so on.
Global Design Options: advanced designing options for header & footer layout and content.
WooCommerce: extensive eCommerce options to help you build a high converting e-store and deliver an awesome shopping experience.
Third-Party Integrations: offers seamless integration with LifterLMS, LearnDash, and Easy Digital Downloads.
Support: get access to 24/7 premium customer support.
Astra: Astra Pro Addon
This can be confusing for some users.
Astra Pro and the Astra Pro Addon are exactly the same. You see, Astra is the base theme that is available for free. When you choose to upgrade to the Pro version, you will need to buy the Astra Pro Addon plugin.
Astra Pro Addon Features
Once installed on your WordPress website in conjunction with the Astra theme, it will provide some enhanced features. The plugin simply introduces tons of addons for different aspects. You can activate and deactivate the add-ons as per your requirements.
This allows you to only keep the features that you are using so you don’t unnecessarily bloat your website with unwanted functionalities and slow it down.
Astra & Other Plugins
With Astra installed on your website, if you visit the Astra Options page, you will see a box that says you can extend the theme functionality by installing additional free plugins.
Additional Plugins for Extended Theme Functionality
As you can see from the image above, this includes:
Astra itself is free. If you would like to see the Astra Pro options, here they are in a nutshell:
Astra Pro – $59
Mini agency bundle – $169
Agency bundle – $249
Let’s explain in detail what each of them offers.
To activate its premium features and functionalities, you have to purchase a license for the Astra Pro Addon, a plugin which has a starting price of $59 a year.
There are two other plans available: the Mini Agency Bundle, which costs $169 a year and the Agency Bundle, which costs $249 a year. It’s possible to upgrade from a lower tier to a higher plan but not vice versa.
Renewals on all annual plans come with a 20% discount.
If you’d rather not pay an annual price, you can buy a lifetime license instead. If, however, you are already in an annual plan and decided to you’d rather want a lifetime license instead, you can easily upgrade.
The price for a lifetime license is $249, $499 and $699 for Astra Pro, Mini Agency Bundle and Agency Bundle respectively.
Annual and lifetime licenses don’t have any differences aside from the duration of the license. No feature, functionality or bonus is exclusive to either license type.
All of their plans, annual or lifetime, come with a 14-day, no questions asked, money-back guarantee.
What are the differences between the plans?
The Astra Pro plan only includes the Astra Pro plugin that lets you access premium features and functionalities including one-to-one support, extensive training, and unlimited website usage.
The Mini Agency Bundle includes everything in the Astra Pro Plan with the addition of WP Portfolio Plugin plus your choice of premium Ultimate Add-on (Ultimate Addons for Elementor or Ultimate Addons for Beaver Builder).
The addons enhance Elementor and Beaver Builder respectively by adding custom widgets, modules or elements. You will also have access to the premium site templates in the Astra Starter Site Library in this bundle.
Finally, the Agency Bundle includes everything from the Mini Agency bundle, including both Ultimate Addons with the addition of Convert Pro, Schema Pro along with any of their future plugins.
No matter the plan you choose, your license can be used on an unlimited number of websites.
Each bundled plugin, e.g. Schema Pro, WP Portfolio, etc. has its license keys which let you use them even on a website that’s not using Astra.
Overall, Astra offers flexible pricing plans that let you choose what you need depending on your budget.
Astra is pretty much perfect when you consider all the awesome features it brings to the table. There is practically no compromise and the theme delivers on all grounds.
However, if we were to do a little more nit-picking then something can be said about not enough third-party integration.
Running a particular niche website isn’t all about the design. You also need access to niche-specific features. However, that’s an issue that can be easily resolved by installing additional plugins. But it is something worth keeping in mind.
Wrapping Up The Astra Theme Review: Is It For You?
If you are tight on a budget, then without a doubt, you should pick Astra blindfolded. It is by far the best free theme on the market.
Whereas if you are planning to get a premium WordPress theme and customization is top on your priority list, then Astra is worth a consideration.
You can especially benefit if you are a developer or designing agency that needs to build various niche websites for their clients. Its diverse collection of ready to use website demos and customization options makes it a priceless tool for web development.
If you are planning to invest in this theme or the Agency Bundles, you could do that during a couple of weeks when they plan to offer a Black Friday and Cyber Monday offer when the prices are got down to minimal. Visit their website to get 30% OFF during this year’s sale season.
Do let me know if you find this Astra theme review helpful. Do you want us to compare the Astra theme with some other popular themes like GeneratePress, Genesis Themes or Divi? Let us know your thoughts or queries in the comments section below, we would be happy to respond.